Showing posts with label pork. Show all posts

Thursday, September 15, 2011

A Very Piggy Birthday | Charcutepalooza, challenge no. 9

I am participating in Charcutepalooza, a year of meat which entails twelve monthly challenges to prepare dishes using various charcuterie techniques.  For more information about charcutepalooza, click here.  To read why I decided to partake in the meatmaking festivities, read my first post here.
 
This past month, I turned 30.  My birthday always falls around labor day, which used to be a huge pain in the ass back when I had to start school around the same time.  But now that I am several years out, it has become something to look forward to (aside from the getting older part), and usually involves a full three day weekend in which to celebrate. This month I was blessed with a particularly perfect weekend - an oasis of good weather during a month of floods, rain and earthquakes.  

I planned to spend the weekend upstate with my parents, but my weekend started much earlier than expected when ken returned home from work, only a couple hours after he left, and hustled me into the car.  Forty minutes later we pulled into the site of every farm to table foodie’s wet dreams: Blue Hills at Stone Barns.  It turns out ken and my parents had been plotting this outing for weeks, and managed to keep me completely in the dark until the very last second!

 
We got there early enough to check out their farmers market, and walk around a bit before our 5:30 dinner.  This place was the platonic ideal for what every farm should be: bucolic & pristine.  And the animals were all happily doing what animals do.
And of course my favorite...  
The baby pigs were particularly adorable.  So much so that I couldn't pick just one photo to share:


After exploring the grounds, we changed into proper dinner clothing, and ate the eight course farmers feast.  It was a very good start to a very delicious and porky birthday weekend.

The next day we consumed our bounty from the blue hill farmers market which included pork hot dogs and a simple tomato salad.

On Sunday, in a combined celebration with my cousin whose birthday is one day before mine, we planned a lunch party.  I’m not a huge fan of sweets so instead of a birthday cake, I planned to serve a meat pie.  I had made Hugh Fearnley-Whittingstall’s raised pork pie back in February, and briefly considering finding a new recipe.  However, the first pie had been such a hit that I decided not to mess with what was already a very good thing.  I hoped that by repeating the same recipe, ken and I could improve our technique, and start ourselves on the path to the pork pie nirvana.  This time around, we put in more herbs (last time we had accidentally left out the thyme), and made it far enough in advance to let the gelatin set.  I also think I improved on the decorations!

 
Back in February we had procrastinated and baked the pie on the same day we planned to eat it, hence the failure to gel.  This time around we prepared the pie the Thursday before we left, to be eaten on Sunday.  (I now know why ken insisted we finish it Thursday night, rather than my original plan of doing it during the day on Friday... sneaky boy!).  I think the time made a big difference in the final product.  While delicious, the February meat pie tasted a bit like an encased meatloaf, while the filling in this one was much more reminiscent of a real pate.

The pie was served with mustard, green tomato and pearl onion pickles (recipe from the blog of charcutepalooza’s co-founder, Cathy Barrow), a german potato salad and grilled eggplants.

And finally , as a bonus, a close friend, and a loyal reader of this blog (thanks, marc!) included these apropo office supplies in his birthday gift to me, perfectly rounding out my very piggy thirtieth birthday.

Monday, August 15, 2011

Tip-to-Toe Terrine | Charcutepalooza, challenge no. 8

I am participating in Charcutepalooza, a year of meat which entails twelve monthly challenges to prepare dishes using various charcuterie techniques.  For more information about charcutepalooza, click here.  To read why I decided to partake in the meatmaking festivities, read my first post here.
The sweetest meat is closest to the bone.  Although the Chinese did not coin this aphorism, they certainly live (and eat) by it, as exemplified by my family’s eating habits.  At yum cha, my grandmother would methodically and joyfully (gluttony is a trait that runs rampant up and down my bloodlines) reduce spare ribs and chicken or duck feet into a neat, ever-expanding pile of delicate white bones, clear of all meat and cartilage.  At an early age, I too was taught to tear flesh off bones and crush shells between my teeth to get at the “best” bits, which were always those hardest to obtain.  Once, in my grade school cafeteria, I was mortified when my dining companion commented on how funny it was that I kept eating chicken wings long after the meat was gone.  Mortified, because in third grade I didn’t want to be “different” (who does?), but I also couldn’t understand how someone with fully functional eyesight could not see the very visible scraps of meat still attached to the wing bones.

To a very small extent this embarrassment has survived into my adulthood.  When served bone-in meat dishes at fancy restaurants, I often ask to get the bone to-go for my non-existent dog, so I can gnaw at it in the privacy of my own home.  Other than that one lapse, I am for the most part proud of my ability to get at every tasty tidbit of meat on a bone and every succulent morsel out of a lobster.  Like learning to make charcuterie and to appreciate offal, eating every scrap of meat is one of the ways I show respect for the animals that die for my enjoyment and sustenance.

I suspect the Chinese love affair with the hard to eat bits originated in frugality as much as in respect.  Regardless of the source of this obsession, its influence can be seen in all Chinese cuisine from street food to banquets.  There are some Chinese delicacies, chicken feet or fish heads for example, that are impossible to finish eating without a mound of soiled and shredded paper napkins piling up next to your plate.  The few bites that you work so hard to get are incredibly delicious and usually more than worth the entire undertaking.  But sometimes I’d prefer to walk away from a Chinese meal without grease stains on my clothing and animal bits in my hair.  For this month’s terrine challenge I chose to turn a traditionally messy Chinese dish, jellied pig feet, into easy-to-eat, slice-and-serve presentation.

At the butcher, in addition to pig feet, I picked up a tongue, two pig ears and, as suggested by Cathy Barrow a pork shank for added meatiness.  I brined the meats for 24 hours as called for in the Charcuterie head cheese recipe, but chose to omit the pink salt.  After blanching the meats to rid them of impurities, I put them in a pot to simmer with onion, ginger, garlic, star anise, several tablespoons of both dark soy and light soy, and water to cover.  This concoction is very loosely based on the recipe for Chinese-style pig’s trotters in The River Cottage Cookbook.  At this stage I was careful to avoid over-seasoning the liquid, knowing it may need to be reduced at a later time.
clearly our "big" pot wasn't big enough - I finished it all up in a stockpot
After about three to four hours on the stove, when the meat was tender and the ears offered only the mildest resistance when pierced with a chopstick, I removed the pieces and strained the liquid, which should have absorbed enough gelatin from the pig skin and cartilage to bind my terrine together.
Last month, I had written about how sausage making was finally coming more easily to me.  I think my arrogance seriously angered the charcuterie gods, who decided this month to make me pay.  My memory of everything after the meat finished cooking is hazy.  I remember it was very very very hot that day.  I remember shredding meat off the pig feet and realizing why glue is made from animal hooves.  I remember ken coming home from work to find every surface in the kitchen - walls, appliances, pots, pans - sticky with the gelatin which seemed to have found its way into everything except into my cooking liquid.  The damned thing would not gel.

Ken somehow wrestled me down off the edge of depression and convinced me to put the terrine aside completely until the morning (and he cleaned! Once again, I am struck by how lucky I am to have him).  The charcuterie gods must have been satisfied with my penance, because everything pulled together the next day.  After reducing the broth by about a third, it gelled up nicely.  From there, the process was straightforward, if a bit messy.  I combined the shredded trotter and shank meat with slices of pig ear and diced tongue and pressed the mixture into a terrine.  I kept one ear intact so I could form a decorative stripe of pig ear through the center of the terrine.  Once the stock was poured over the meat, the entire thing was weighted and put in the fridge until ready to be unmolded and served.
Since presentation was a big part of this months challenge, I wanted an appealing spread of accompaniments.  Barbara Tropp’s The Modern Art of Chinese Cooking opens with a chapter on the Philosophy of Chinese Cooking in which she describes an overriding characteristic of Chinese cooking to be the “conspicuous juxtaposition [of]...flavors, textures, colors, food types, and cooking methods.”  It was with this principle in mind that I chose the dishes which would accompany the terrine.  From Tropp’s book*, I made fire-dried walnuts, which were crunchy, meaty, and slightly sweet and bell pepper pickles with vibrant colors that contrasted their subtle sweet-soy seasoning.  

*I see the irony that my Chinese recipes come largely from Western writers.  I have a theory which I won’t go into today, that often the best culture-based cookbooks come from outsiders to that culture.  
adorable mini-bell peppers I found at the greenmarket
Szechuan cucumber pickles, from Su-Huei Huang’s Chinese Cuisine contributed a bold spicy flavor with bright vinegar overtones.  And finally, the meal was rounded out with stir-fried bitter melon.  All, of course, served over a bowl of steaming white rice.

The terrine was good, although I’d do some things differently next time I make it.  For one, the gelatin itself needed much more robust seasoning.  I was so worried about adding too much soy the first day, that I overcompensated, and ended up with a slightly bland binder.  Also, next time I would probably leave out the ears.  The crunch was slightly disconcerting (which is odd because I am quite fond of another Chinese dish, pressed pig ear terrine), and there was a slight off flavor to it which I couldn’t help but associate with ear wax.  If I ever get around to making an actual headcheese, I will need to find something more palatable to do with the ears.  These complaints are just nitpicking, though.  Altogether this was a nicely balanced meal, where each component complimented the others.  I’d never had a terrine over rice before, but found it to be a very pleasant combination.  While mostly holding its shape, the gelatin melted just enough to season the rice beneath it.  The dish was complex in flavors and textures, and perfectly showcased the terrine.

unfortunately it didn't slice as cleanly as I'd hoped

Sunday, May 15, 2011

Chorizo Tamales | Charcutepalooza, challenge no. 5

I am participating in Charcutepalooza, a year of meat which entails twelve monthly challenges to prepare dishes using various charcuterie techniques.  For more information about charcutepalooza, click here.  To read why I decided to partake in the meatmaking festivities, read my first post here.

Spring means so much more than just the onset of warm weather.  For some it is about the colors; it is the season when blossoms explode in their riotous hues.  For others, it is all about the food as ramps and fiddleheads make their puckish appearances.  But for me, spring has a darker edge: every year it sparks in me a devastating wanderlust.  Each spring day with picture perfect roadtrip weather, warm enough to drive with the windows down, overcast enough to keep from baking, makes me want to jump behind the wheel and revel in the open road.  Frustration sets in when I realize I am living smack dab in the middle of a city of over eight million people, trapped in on all sides by hours of gridlock.

With this restlessness stirring within me, choosing to make chorizo for this month’s charcutepalooza challenge (making uncased sausages from scratch) was a no brainer.  The southwest has been a feature of several past road trips, memorable for the food as much as for the otherworldly landscape.  And recreating those flavors, and memories, was just what I needed to alleviate a little of my cabin fever.

Monument Valley, on the border of Arizona and Utah
Making sausages from scratch is an extremely rewarding process.  The flavor profile can be tweaked to exactly fit your taste.  In this case, I included dried New Mexican red chiles, which I had purchased near the Guadalupe mountains in Texas on my last road trip, to bring out a more southwestern taste.

 
Deciding to make tamales with my chorizo was also an easy decision.  It was on a much earlier trip through Texas and New Mexico with two of my best friends, where I first learned to love the taste of corn tortillas.  Their earthy flavor and grainy texture is an acquired taste in contrast to the simple pleasure of their flour counterparts, but one I acquired with a vengeance.  The taste became something I craved in its other forms as well: in hominy and of course in tamales.  I’ve made tamales a couple times before, but only using masa harina, a poor substitute both in taste and nutritional value for the traditional nixtamalized masa.

So last weekend, ken and I ventured out to Jackson Heights, home of Tortilleria Nixtamal, one of the few places in the metro-ny area where traditional masa can be obtained.

Of course on such a gorgeous day, we couldn’t resist sticking around for lunch.  Lounging in the airy back patio, secluded from the city by a brilliant yellow fence, with soccer “en vivo” airing on the flatscreen, we felt transported to a more exotic place.  For about an hour that sunny Saturday afternoon, we got to eat tacos, tamales, and a big bowl of pozole, sip Mexican coca-cola, and pretend we had finally escaped the big apple.

Pozole with tacos carnitas and al pastor
Close up of the pozole, full of delicious hominy
And that evening we returned home with a most precious souvenir, three pounds of freshly ground masa!
We kept the tamale filling simple - chorizo sauteed with shallots and garlic until just cooked through, to highlight the carefully calibrated flavor of the sausage.

The dough was made following the instructions in this Rick Bayless recipe, with tremendously good results.  The trick, I learned, other than using real masa, is to use home rendered lard.  

Once a nutritional scape goat, it is now generally accepted that cooking with lard does not require a death wish.  Home rendered lard is more nutritionally sound than the packaged stuff, which is hydrogenated to make it more shelf stable.
  (For more info check out these articles from the new york times, slate, and food and wine.)  The lard, whipped to a buttercream consistency, ensures flavorful, fluffy tamales (as opposed to the dry dense tamales one usually encounters).

The whipped lard is combined with masa and chicken stock to make a dough with a consistency similar to cake batter.  The tamale dough is then spread onto pre-soaked corn husks, and topped with a generous scoop of chorizo filling.

Each side of the corn husk is folded over to completely enclose the tamale, and the ends are tied off with thin strips of corn husk.  At this point, the tamales are ready to be steamed and served. 

In all modesty, these were the best tamales I have ever had.  Usually I find tamales slightly dry and a little bland, primarily a vehicle for showcasing a flavorful and saucy filling.  The lard of course added a lot of flavor, but more startling was the prominent corn flavor, reminiscent of my travels through the land of enchantment.  The texture was moist and airy, a perfect bed for the juicy chorizo filling.  

It was with great pride that I brought these tamales to our mothers’ day pot luck dinner.  Although compliments from people who love you have to be taken with a grain of salt, everyone, my mom and grandmother included, raved about my contribution.  And the opportunity to spend an evening with my family, enjoying delicious food and each others company, made me realize there are some things worth staying close to home for.  
Tamale served with a guacamole taquero
----------------------------------------------
The process described above was based on a tamale dough recipe which requires no alterations from me, and on a filling so simple, no written recipe is necessary.  However, I wanted to offer a recipe to my readers, and so I asked ken, who is a great, amateur bartender to come up with a cocktail pairing.  If eaten outdoors on a sunny day, these tamales need nothing more than a cold beer, or maybe a michelada.  But if you want to make them part of a more classy Mexican inspired cocktail party, this is the drink we suggest:

Choke-a-mole
loosely based on the Choke Artist
40 ML Tequila Blanco
20 ML Dry Vermouth
20 ML Cynar
2 Dashes of Bitterman’s Mole Bitters
Stir with Ice, strain into whatever kind of glass you feel like using.  Garnish with lemon peel.  

Friday, April 15, 2011

Tasso | Charcutepalooza, challenge no. 4

 
After our charcutepalooza “practice run" with smoked turkey, ken and I tackled the official challenge, making tasso ham, a cajun dry-cured and smoked pork shoulder.  Because the pork shoulder is sliced into thin slabs before curing, it calls for a relatively short curing time of four hours.  The entire process of making tasso can be completed start to finish in less than one day, which is about as close as any charcuterie project can get to offering instant gratification.  After curing, the slabs are coated in spices and smoked.

The day before we had problems getting the Bradley smoker up to temperature, but decided to give it another try.  Ken deftly diagnosed the problem, finding that the lever that controls the temperature wasn’t working.  He employed his expert engineering skills, and with crackerjack timing, fixed the faulty lever by “jiggling” it while making temperature adjustments.
And less than three hours later, we had tasso!


We had eaten tasso before, but it was nothing like this one.  The meat was juicy and salty, the crust almost too spicy to enjoy alone (I may have overdone the spicing), but perfect in a gumbo, which is exactly how we ended up using it.  
Our go-to cookbook for cajun cooking, Chef Paul Prudhomme’s Louisiana Kitchen, has several gumbo recipes but none that use tasso.  However, we have made the seafood and andouille gumbo so often that we figured we had the basic technique down well enough to improvise.  
One of our favorite stands at the greenmarket is John Fazio’s Duck Farm, which sells chicken, duck and rabbit.  Although they are our regular source for chicken and duck (and, in fact, they supplied the meat for my first charcutepalooza challenge, duck prosciutto), we have never actually cooked one of their rabbits.  Thinking this would be a great time to remedy the omission, we chose to make a rabbit and tasso gumbo.
This was my first time working with rabbit so, although the meat would ultimately be shredded into soup, I took the opportunity to try my hand at breaking it down into its usable parts.  For reasons completely beyond me, I had assumed it would be like taking apart a really skinny chicken.  Apparently someone needs to explain to me the difference between a bird and a rodent.  A rabbit is a rodent, right?  Regardless, I think I did a pretty good job with this bunny for my first try.
In fact I was so proud of myself for getting the tenderloins out somewhat cleanly that I kept them out of the soup, and featuring them in their own course alongside the liver.
Whenever I make meat based soup, strew, ragu - anything which requires both a braise-tender meat and stock, I like to braise the meat ahead of time, over a basic mirepoix, bay leaf and parsley.  I remove the meat once it reaches the desired texture and strain the liquid, yielding plenty of stock to use in the final dish.  Although less crucial for a lean meat like rabbit, this method allows me to degrease the liquid in advance, strain it of impurities, and reduce it as necessary, without worrying about overcooking the meat.  Applying the same technique here yielded tender boneless rabbit meat, and just over six cups of flavorful rabbit stock.
One of the most important parts of a gumbo is the prep work.  Once the actual cooking starts up, there is very little time to get things measured and chopped, even with two people in the kitchen (especially when one of them is busy taking pictures of the process!).  To prepare for our gumbo cooking we combined and set aside all the necessary seasoning, and brought the stock to a simmer.  We combined chopped garlic, onions, celery and green bell peppers in one bowl.  And, in another, went our lovely diced tasso.  
And finally we started the actual gumbo, which began, as all gumbos do, with a dark roux.  This is the most labor intensive part of making the gumbo, because it requires constant whisking and careful attention.
Once the roux took on the right color, half of the chopped vegetables were stirred in, followed a couple minutes later with the rest of veggies and the diced tasso.  After a few more minutes we stirred in the seasoning mix and removed the pan from the heat.
We then added the roux mixture to the bubbling stock, one spoonful at a time, stirring all the while to make sure it was well incorporated, and brought the whole thing to a gentle boil.  At this point the stressful portion of the cooking is over.  We let the gumbo boil away for about 45 minutes, allowing the flavors to develop and the gumbo to thicken slightly, while we enjoyed our first cocktail of the evening, a Vieux Carre.  The recipe came from the ever informative site on all things New Orleans, The Gumbo Pages).  
After 45 minutes of boiling, we reduced the heat and added the rabbit meat.  The gumbo simmered for ten more minutes, before we served the whole thing over Prudhomme’s basic cooked rice.
And the final product?  Amazing!  I was afraid I would miss the taste of the andouille but the tasso gave it the perfect spicy smoky porky flavor.  We both preferred the tasso to our usual andouille, as the sausage often leaves a grease slick on the surface of the final gumbo.  There’s a good chance as long as there is tasso in our freezer, it will be replacing andouille in most of our cajun cooking.  Until, of course, we have a smoked sausage challenge, in which case a homemade andouille may be back in the running. 

Tuesday, February 15, 2011

Pancetta | Charcutepalooza, challenge no. 2

When ken and I first purchased the Charcuterie cookbook several years ago, we made an ill-fated attempt at the pancetta, which turned out to be a complete disaster. We were both living in Boston at the time, a city neither of us knew well enough to source good ingredients. Unable to find a decent butcher to obtain an entire belly, we turned to a nearby Asian grocery store where we did a lot of our student budget shopping, for smaller slabs of pork belly. The meat we got there in the past was of questionable quality, so to compensate, we cured the belly for much longer than suggested (despite the small size), and probably used much more pink salt than necessary. When the “pancetta” finally emerged from its cure, it was firm, beautifully pink, but had an overwhelming chemical-saltiness. Even after blanching the belly in an attempt to flush out some of the salt, the meat was irreparable.

When this month’s Charcutepalooza challenge: the salt cure, was announced one month ago, I was ecstatic - this was our chance to redeem ourselves. Keeping in mind our earlier mistakes, we were much more careful in weighing out the cure ingredients. Back on my home turf of new york city, procuring a larger (and better quality) piece of pork belly was not a problem. After 7 days of curing in the fridge, parts of the belly were still quite squishy so we left it for another couple days. After nine days the pancetta was still slightly squishy, but haunted with memories of our first over-salted failure, we declared it sufficiently cured, and moved on to the next stage: rolling the belly, and tying it tightly to avoid air pockets where bacteria might grow. I had practiced the tying process on a paper towel roll, and with helpful twitter advice from @BobdelGrosso and @KatedeCamont (of A Hunger Artist and Camont a culinary retreat in Gascony, respectively) became fairly competent. I discovered however that working with actual meat is a whole new ball game - a difficult project even for two people. The meat was slippery, greasy, and certainly did not want to stay rolled up. Plus as the twine got wet, it become fragile, often tearing when we pulled too hard in our attempt to tighten the roll. After a lot of cursing, re-rolling, and wasting of twine, we finally had a pancetta roll we were reasonably happy with.

For the next step, air drying, I was determined to find a better solution than I had for the duck prosciutto, which I hung in the fridge. The problems of before (apartment (small very dry one bedroom) and boyfriend (low tolerance for cold temperatures)) were equally applicable now. The compromise solution I came up with, was to turn the bedroom into a meat curing chamber by day (while ken was at work). Each morning, we would put a steaming tray of salt water into a small bookshelf near the window, which we had loosely covered with a shower curtain (to preserve the humidity). As ken was about to leave for the day, we’d open the windows until the temperature dropped low enough to hang the pancetta in the bookshelf, where it remained for the rest of the day. Each night we’d return the pancetta to the fridge, where it spent the night on a rack over a tray of salted water (again to avoid overdrying). Although our meat drying solution was laborious and far from elegant, it was entirely worth it! There were days (20 degree days, when I needed a winter coat just to grab something out of the bedroom) when I had my doubts. But after tasting the final product (compared to a sliver we had cut and fried up immediately after taking the belly out of the cure) it was clear that it was worth the effort. After our taste test, even ken wanted to extend the drying process as long as possible. The difference in flavor was drastic. The meat was denser, porkier, and had some of that funk you get from a good cheese or a dry aged steak.
I am a little ashamed to say how much of the pancetta our two person household has already managed to consume. The very first dish we made with our homemade pancetta was an English pork pie from one of our favorite cookbooks, Hugh Fearnley-Whittingstall’s The River Cottage Meat Book. We followed the recipe pretty closely with a few small changes in the flavor profile. Although pancetta only played a small role in the recipe, I wanted to mention it here for a couple reasons. First, because it was our very first use of our newly cured pancetta. Second, because it felt like a nice precursor to potential charcutepalooza adventures in the future (a meat pie is really just a rustic - and round - pate en croute, after all). And lastly, because I’m particularly proud of the charcutepalooza inspired decorations!
The biggest failing of this dish was the result of a lack of patience on our part - a common theme for us. We cut into the pie before the jellied stock filling the space between the meat and the crust had a chance to set, causing a huge mess reminiscent of the gulf oil spill. Despite the mess, the meat pie tasted wonderful with a little mustard and cornichon, paired with a light radish salad.
And, we have a couple jars of jellied stock leftover in the freezer which I have big plans for!

The second dish I wanted to share, arose out of an entirely unexpected and generous gift. Last Wednesday at the greenmarket, I was buying a few clams when the guy working at the fish stand asked me: can you make chowder?
Thinking I misheard him, I answered: no, I’m planning on doing a pasta.
He shook his head: no, you’re not understanding what I’m asking you. Do you know how, and do you have time to make chowder?
I nodded, although to be honest, I’d never done it before but had been wanting to recreate a favorite of ours which we used to eat regularly back in Boston.
He reached under his stand and pulled up a bag full of some of the biggest clams I’d ever seen, and handed it to me: These are for chowder, it has to be made today.
So, what could I do? I lugged the bag home (close to five pounds!), canceled my dinner plans and started looking up chowder recipes.
I can’t stand gritty clams, so the first thing I did was scrub them down and put them in cold salted water to soak. Later that evening when we were ready to start preparing dinner, we gave the clams a last scrub, and put them in a pot with about a cup of white wine, to steam them open. I have to confess that I was pretty nervous at this point. I can be pretty cynical at times, and am generally suspicious of anything that looks too good to be true. When offered something for free usually my first thought is, what’s wrong with it? or, what’s the catch? Wary of these free monster clams, I was expecting the worst. But clearly my nervousness was misplaced. Not only did each clam dutifully pop open, but some were so strong they took up to twenty minutes before giving up the ghost. After the last one popped, we strained the liquid out, yielding about four cups of rich salty clam broth.
Once the broth is prepared the rest of process can be done fairly quickly. A couple slices of our pancetta were cut into lardon, sauteed until crispy, and then set aside.
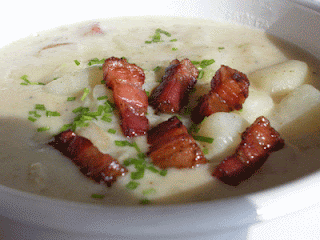
Diced onion and russet potato, along with a couple cloves of minced garlic and two stalks of celery, sliced, were added to the pancetta fat, and cooked until slightly browned. About half of the clam broth was then added to the pot (the rest was put away in the freezer for future use). The vegetables and broth simmered together for about 10 minutes, after which time we added about a cup of half and half, and let it continue cooking until the potatoes were tender, and the creamy liquid had thickened somewhat. Once the potatoes were cooked through, we tossed in the clams, which had been extracted from their shell, and roughly chopped. I would normally put the clams in at the very last minute of cooking, just to reheat the meat, but once again, I let my suspicious nature take over. Despite all evidence that the clams were perfectly healthy, I let them simmer another five minutes to ensure they were completely cooked through. Pepper was added to taste. Between the clam broth and the pancetta, additional salt was unnecessary. And finally, each bowl of soup was garnished with chives and the crispy pancetta, and served alongside slices of sourdough bread for mopping. This soup was delicious, despite the fact that I overcooked the clam meat, which was chewier than I’d like. Although less rich and creamy than the version we loved in Boston, this soup certainly satisfied our craving. Next time, assuming we have a little more notice, ken will bake sourdough bread bowls to complete what was otherwise a perfect cold weather meal.