Friday, July 15, 2011

How to half-ass a weisswurst | Charcutepalooza, challenge no. 7

I am participating in Charcutepalooza, a year of meat which entails twelve monthly challenges to prepare dishes using various charcuterie techniques.  For more information about charcutepalooza, click here.  To read why I decided to partake in the meatmaking festivities, read my first post here.
Usually I approach my monthly charcutepalooza challenge like a celebration, with days of planning and eager anticipation.  This month it was hard to muster up a similar level of enthusiasm.  Not that I was unhappy with the challenge.  On the contrary, I had been anxiously awaiting the emulsified sausage challenge, for which I had planned to create my own version of the Chang Dog, completely from scratch with homemade buns, kimchee, bacon, and of course the hot dog.  But when the challenge finally rolled around my heart wasn’t in it.  With a big trip to Maine approaching all I could think about was seafood.  For the first time since this year of meat started, I just wasn’t craving any.
 
Beside all that, finding time to get upstate where we have access to the smoker, which we needed to make hot dogs, was simply not feasible.  Not only was I occupied with all the normal things that need to be taken care of in the weeks before traveling, but ken managed to come down with a bad three week long summer cold which left him for all practical purposes, incapacitated.  I never realized how much ken does to make my life easier and better until he went out of commission, and everything just started falling apart.
At first I considered skipping this challenge altogether, but couldn’t justify it to myself as we had all the equipment necessary plus about a lifetime supply of hog casings in the freezer.  We chose to make weisswurst mostly because it was simple enough to do in the limited time we had, and mild tasting enough for ken to eat on a queasy stomach.  So on a day that ken was feeling well enough to help out, and I had a few free hours to kill before running out to meet some people at a party (gay pride - this year you couldn’t live in ny and not celebrate!), we banged out three pounds of weisswurst.

Unlike the fresh sausages we made last month, the meat in emulsified sausages is ground twice, the second time with ice, and then whipped into a stiff paste before being stuffed into a casing.  Maintaining the temperature is extra crucial because the meat is so extensively manhandled.  Otherwise, the process is pretty much identical.  And the practice we had making the fresh sausages paid off - we had a surprisingly easy time making these weisswurst.  It still took a lot of time, but everything felt like it came together rather seamlessly - even the pastry bag technique felt less onerous.  I guess it’s really true what they say that doing is the best form of learning. This may be an obvious lesson to most, but I’ve always been the type to over-think any potential undertaking.  I had owned and sporadically read through Charcuterie for years, but all that reading and learning didn’t teach me how to make sausages.  It was only by using the grinder, and stuffing sausages regularly the past couple months that I finally started to get the hang of it.

That’s not to say that we are experts, or even particularly good yet.  I mean, check out the air pockets in the casing!  But the process is finally feeling a little more routine, and less like a huge and unpredictable endeavor.

Once, years ago, after cooking a huge multi-course meal for my family, I asked my grandmother what she thought.  Her reply was that it was good but that I was a “fun cook”.  At the time, I was confused, and probably slightly offended, but I now understand what she meant.  Any reasonably skilled cook can make a great meal when it is for an event or a meal that they are excited about planning and preparing.  The true test of a good cook is how well they can put together a meal when they are tired or cranky, or would rather be doing other things.  Although we’ve made sausages successfully a couple times now, it took making them when neither of us were at all excited about eating them (ken ate reheated soup that night and I went out), to finally start feeling proficient at it.  

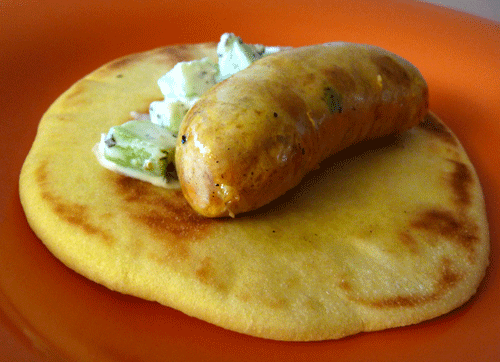
I thought I could muster up the enthusiasm to make homemade pretzels and mustard to go with them the next day, but after waking up with the worst hangover in existence, it was clear that was not going to be an option.  So without further ado, our charcutepalooza dish: weisswurst and, um, sliced bread.

I sincerely hope a recipe is not necessary.


And just so I’m not a total downer, here are some of the things we were actually excited about this past month:
lobster roll that we ate on our way out - first meal in Maine!
the view from our home away from home
fox living on premises, who made an appearance every day
around cocktail hour

learning how to humanely dispatch a lobster
cooking shellfish on the beach
 

fried clams that we ate on our way home - last meal in Maine
With a headcheese challenge on the way, I can assure you, I’ll have more enthusiasm for next month’s charcutepalooza post!


P.S. If anyone knows how to better control the spaces between pictures in blogger, please please please let me know.

Friday, July 1, 2011

Farmer's Market Finds

I am in the midst of packing for a week long trip up in the wilds of coastal Maine.  While there, I hope to be completely offline except when absolutely necessary, and yes, that includes twitter (eep!).  Before disappearing I wanted to share a couple things I've been working on.  

The warm weather and amazing produce at the Greenmarket has been pushing me to experiment more with color in my artwork.  This past wednesday I finally made it out to the market early enough to have my pick of the goodies at Honey Hollow Farm.  Most of their produce is foraged, so it is highly seasonal, susceptible to vagaries in the weather (as I learned when I attempted to buy morels this past spring), and like all scarcities, are in high demand.  There have been times that I've gotten to the market around noon, and find their stand completely wiped out.  

This time, however, by stopping off before my early morning printmaking class, I had all of their early summer bounty to choose from.  Here are some sketches of what I picked up:
Daylily Buds

Chanterelles
Happy Fourth of July!

Wednesday, June 15, 2011

Two Tastes of Family | Charcutepalooza, challenge no. 6

I am participating in Charcutepalooza, a year of meat which entails twelve monthly challenges to prepare dishes using various charcuterie techniques.  For more information about charcutepalooza, click here.  To read why I decided to partake in the meatmaking festivities, read my first post here.

THE FIRST TASTE: the apprentice challenge

Its funny how much you can learn, just by acknowledging the limits of your own knowledge.  I was born in New York City, a hot spot of culinary adventuring, to parents who took full advantage of all that the location had to offer.  To my inflated city girl ego, I was a worldly diner who knew everything there was to know about Italian food.  And then I met ken.  The first time he made me a real marinara was a revelation.  For some reason, entirely beyond me now, I had always thought that the type of  food served at red sauce pasta & pizza joints was somehow fake or americanized: the chop suey of Italian cuisine.  The slow cooked sauce ken made me was perfectly smooth, sweet, but far from cloyingly so.  It has since become a favorite of mine, perfect with meatballs over homemade orrecchiete.  Once I opened myself up to learning more about Italian food, I found ken and his family a wealth of information.  I learned about the timpano, a multi-day cooking production of Big Night fame.  Another dish I learned of, Italian greens and beans is so simple, and so satisfyingly rich and comforting, that I am sad just thinking of all the years I didn’t know of its existence.  Since then, I have come to associate this dish closely with ken’s family.  The first time we went to L.A. together, ken’s uncles welcomed me into their home, and served me this dish: tender cannelini beans with wilted dandelion greens, fresh from the farmers market.  Ken’s mom makes a more traditional version with escarole, a green I had never tasted before, but which has a bitterness I have since learned to love.  At a restaurant in Utica, the city where his family is from, we had a version so loaded down with pancetta and pepperoni that I had trouble recognizing it as the simple hearty, healthy dish I had first been introduced to.

 
Last fall, we had purchased a ton of fresh cranberry beans from Bodhitree, one of our favorite farms at the Union Square Greenmarket.  Most were eaten almost immediately, but we saved a quart of cooked beans in the freezer, planning on using them with the first greens of spring.  This past month, with greens finally abundant at the market, a half pound of leftover pork in the fridge, and a sausage making challenge on my mind, I decided it was finally time for me to come up with my own version of greens and beans.  Back at the Bodhitree farmstand, I hit my first hiccup: no escarole.  No worries, they recommended curly endive, another new vegetable to me, and one which worked beautifully.  It had the same bracing bitterness, but with a sturdier leaf which took a bit more time to become tender.
I am a fortunate girl in that I am often given very good advice.  A good friend of mine, who also happens to be a professionally trained chef, recommended using the kitchenaid sausage stuffer attachment with all its known imperfections, over my planned method: a pastry bag.  Unfortunately, I am also a very stubborn girl (there goes that ego again) and that is how I found myself alone in the kitchen, swearing at a pastry tip for being too damned short, while trying to thread three feet of hog casings onto it.  Suffice it to say, there are no pictures of the process.  It took about two hours before I finally had my first sausages, exactly three links of hot Italian (based on the recipe in Ruhlman and Polcyn’s Charcuterie).  And now I also know why people don’t make sausage in half pound batches.
Regardless of the myriad inefficiencies in the making, these sausages were juicy, flavorful, and tasted great in greens and beans.
Greens and Beans with Italian Sausage
This dish is hearty enough to be a meal.  If there are unexpected diners, it can easily be stretched into a soup with the addition of water or stock (and salt to taste!).
Ingredients:
½ lb hot Italian sausage
1 onion, chopped 

olive oil
2 cloves garlic, minced
1 bay leaf
1 bunch curly endive or other bitter leafy green, such as escarole, dandelion greens, washed and cut up.
1 quart cooked beans, preferably fresh, but fine if dried, or even canned 

parmesan for grating 
salt and pepper to taste

1.  In a large pot, saute the sausages until the skin is caramelized, and they are just cooked through.  Remove the sausages from the pot, being careful to leave behind as much of the fat as possible.  When they are cool enough to handle, slice them and set them aside.
2.  Add olive oil to the pan if there is not enough of the reserved sausage fat.  Add the onion and cook until sweated but not browned.  Then add the garlic and the bay leaf and saute for another couple of minutes, until the garlic is fragrant.
3.  Stir in the greens, and cook until wilted.  Add about a half cup of water, turn down the heat, cover the pot and let it cook until the greens are tender.  Feel free to add more water if it boils off before the greens are to your liking.  Once you are happy with the texture of your greens, remove the lid, and turn the heat up until most of the water has simmered off.
4.  Add the cooked beans, stirring gently to avoid smushing them.  
5.  Stir in the sausage slices, and let the whole thing simmer for a few minutes while the flavors blend together.
6.  Add salt, pepper, and grated parmesan to taste.
7.  Serve alongside parmesan for grating, for those who prefer a cheesier taste.


THE SECOND TASTE:  the charcutiere challenge

Since ken’s family was so well represented in this challenge, I didn’t want my own to feel left out. For the second part of the challenge: inventing my own poultry sausage, I drew inspiration from my parents.  Although my personal heritage is Chinese and Eastern European, my culinary background is much more complicated.  My dad did most of the cooking for us growing up, and has always loved to experiment with various cuisines from around the world.  A week of dining in their household could easily start with a simple pasta or risotto, followed later in the week by a Korean inspired braised short rib dish, and end with a Mexican grilled chicken taco feast with all the works.  A recent addition to his winter repertoire of braised dishes is a chicken tagine.  Although usually a staple of cold weather cooking, this dish and Moroccan food in general has been on my mind, because currently, my parents happen to be vacationing in Marrakesh.  Jealous of the food they must be enjoying, I decided to take the exotic flavors of a tagine and stuff them into a casing: a sausage perfect for summertime grilling.

Wanting to use some of the gorgeous preserved lemons I had in my fridge, a generous gift from a friend (the same friend, in fact, who wisely but unsuccessfully tried to guide me away from sausage stuffing via pastry bag), I chose to base my sausage on a preserved lemon and olive chicken tagine, for which many recipes exist online.
The largest impediment to the making of these sausages was the terrible heat wave we experienced here in the Northeast last week.  Sausage meat has to be kept exceptionally cold to keep the fat from separating.  Usually this requires keeping all the grinding equipment, bowls and meat in the freezer, something I am ashamed to say was not really an option for me.  They say confession is good for the soul, so at the risk that one of my concerned readers will be reporting me to the producers of Hoarders, I would like to show you all the inside of my freezer:
Yes, that is a bag falling out as I took this picture. My freezer is a deathtrap.
Clearly I have a problem.  There was zero possibility of fitting a bowl in.  I only managed to get the meat in by cycling out quarts of stock, and the grinder hardware, by wedging it between a bag of chicken carcasses and a tupperware full of duck fat.  As a safeguard against the oppressive heat, I ground my sausages (4 lbs this time around) in two batches, cleaning and rechilling all the equipment between each round.  Apparently the fat survived because these were some of the juiciest sausages I’ve ever eaten!

Unfortunately I couldn’t get my hands on the kitchenaid stuffer attachment in time to make these sausages so once again I had to make do with the pastry bag.  But this time, with some experience, and an extra set of hands (ken’s) to help out, the stuffing went much faster and with a lot less swearing.

Having issues with twisting links, and no kitchen twine on hand, I tied each link
off with extra casings.   It's not pretty but it worked!
We were just planning to eat these with regular pitas, but ken took it upon himself to find this recipe for Morrocan flat bread known as a batbout.  Batbouts are not baked, rather they are cooked on a stove top, making them ideal summer breads.  Although similar to pitas, these flat breads were a bit chewier because of their high semolina content.  
We ate the sausages gently grilled, with a tzatziki-like condiment of diced cucumber, greek yogurt, mint, garlic and lemon zest.  Even wrapped in the batbout, this was a messy meal, best eaten outdoors with those closest to you, who won’t mind you licking your fingers.
Chicken Tagine Sausage with Preserved Lemons and Olives
The base recipe for these sausages came, as always from Ruhlman and Polcyn, this time from their Chicken Sausage with Basil and Tomatoes recipe.  I wanted to use their meat to fat to salt ratio but discovered too late, that I had only half a pound of back fat in the freezer, a full pound less than they called for.  Still the sausages were sufficiently juicy and fatty, a fact I attribute to the quality of the chicken thighs.  I will write the proportions I used here, but more fat certainly won’t hurt.  Also, the spice amounts included are approximations.  Season, as always, according to your tastes.
Ingredients:
3 ½ lbs chicken thighs, diced
½ lb back fat, diced
30 g salt (careful here as the preserved lemon and the olives add a fair amount of salt, especially if you, like me, forget to rinse the lemons before prepping them)
1 preserved lemon rind, rinsed and then minced
2 cloves garlic, minced
1 tsp grated ginger
1 tsp cumin
1 tsp paprika
1 tsp tumeric
¼ tsp ground cinnamon
¼ cup green olives, diced
¼ cup red wine vinegar, chilled
¼ cup olive oil

1.  Combine all the ingredients except for the olives.
2.  Let the meat and seasonings sit for as long as overnight, in the fridge.
3.  Grind the meat according to the instructions in Charcuterie, being very careful to keep everything cold.
4.  Mix the ground meat using the paddle attachment on the mixer for a couple minutes, adding the vinegar, the olive oil, and lastly, the diced olives while mixing.  
5.  Fry up a small portion of the sausage to taste.  Adjust the seasonings accordingly.
6.  Stuff the sausages in hog casing.
7.  Grill the sausages gently and enjoy!

Friday, June 3, 2011

Springtime on a Plate

Not too long ago, my printmaking teacher said something quite humbling to me in response to a glib remark of mine: that current methods of art history education (requiring large amounts of rote memorization) were obsolete in the current age of google.  His response was that through reliance on technology we forfeit our abilities.  

In hindsight, it is unsurprising that someone who teaches printmaking would see the value of preserving skills many would consider obsolete.  The real question is why, as a student of printmaking, I didn’t instinctively feel the same way.  The truth is, that in a lot of ways, i do.  Take cooking for instance.  Almost all the cooking I do, practically speaking, is obsolete.  I could just as easily buy everything premade and packaged, ready to be microwaved.  But I choose to preserve my cooking abilities because I find it enriching.  And my teacher was absolutely correct about the effects of our reliance on search engines.  Since getting a smart phone and consequently always having googling capabilities at my fingertips, my memory, which has served me well in the past, is suffering.  I used to be able to ace exams that I crammed for the night before, vocab and grammar rules used to come easily to me when learning new language.  Now, those memory feats seem entirely unattainable.  One summer shy of thirty, I’m certainly not old enough to blame my age for my forgetfulness.  By always taking the easy way out: constantly checking wikipedia for facts, bookmarking information instead of retaining it, I have forfeited, i.e. actively surrendered my memorizing abilities.  

So what’s my point?  I’m not saying that I want to go live under a rock, eating termites, so I don’t lose my poking-sticks-in-logs-to catch-bugs skills.  Clearly no one person can be highly skilled at everything.  My point is that I need to be more aware of the payoff, or cost of convenience.  The decision of which skills I want to maintain, and which I am willing to relinquish must be made consciously and deliberately.  

In considering what other abilities I have put in danger of forfeit, it is clear to me that technology is not the only culprit.  Any voluntary relinquishment of a responsibility can effect a forfeiture.  Ken and I almost always cook together and the division of labor naturally gravitates towards our respective strengths.  I realized that over the years my comfort level with the tasks he usually assumes has fallen although I was perfect adept at them before we started seeing each other.  I would never give up cooking together.  Our ability to cook so well together (despite the fact that I am a recovering kitchen bully* with occasional relapses) is one of my favorite things about our relationship.  But I have decided that every so often I should cook an entire meal from conception through execution alone, just to maintain those skills which I would be loath  to lose.  

* years ago the nytimes published an article on kitchen bullies and my first thought on reading it, unhappily, was that it described me to a T.
My first solo meal was inspired by the early spring produce at the farmers market, and by this Hank Shaw blog post.  I was hoping to mimic his use of the season’s trifecta: ramps, fiddleheads and morels, but unfortunately, according to the folks at the greenmarket, the weather (constant rain, followed immediately by intense heat) ended our morel season early.  No worries, the fiddleheads and the ramps paired with a roast rack of lamb more than represented for the season.
 
I prepared the fiddleheads by trimming them and rubbing off their brown papery husk.  They were then pre-boiled for about five minutes in well salted water.
Usually we are so enamoured with ramps when they finally show themselves after a long winter, that we do as little as possible to them, opting for just a basic saute.  While I certainly enjoy them that way, I find two faults with our usual preparation.  First, the greens on top tend to cook much faster than the pink bulbs at the root-end, leaving either overcooked greens, or too crunchy bulbs.  Second, I find that merely sauteing the greens tend to leave them a little too fibrous and difficult to eat. For this meal, I chose to separate the two parts, and prepare each differently.
I made a sauce for the lamb by combining blanched and chopped ramp greens with greek yogurt and lemon zest.  This yielded way too much for one meal, but the leftover sauce, enhanced with an assertive addition of paprika and cayenne, made for a great chicken marinade the next day.
I sauteed the bulbs and the fiddleheads together and served them with crisped gnocchi.  (I have to confess that the gnocchi were in the freezer, and most likely made by ken).  Alongside a roasted coriander spiced rack of lamb, this dish was a lovely celebration of the spring.

Tuesday, May 24, 2011

Conch Shell Aquatint

I used a drawing of the baby conch shell I posted about previously for my first attempt at an aquatint:
The final product could be cleaner but I'm loving the textural tones.  Aquatint may be my new favorite printmaking process.

Sunday, May 15, 2011

Chorizo Tamales | Charcutepalooza, challenge no. 5

I am participating in Charcutepalooza, a year of meat which entails twelve monthly challenges to prepare dishes using various charcuterie techniques.  For more information about charcutepalooza, click here.  To read why I decided to partake in the meatmaking festivities, read my first post here.

Spring means so much more than just the onset of warm weather.  For some it is about the colors; it is the season when blossoms explode in their riotous hues.  For others, it is all about the food as ramps and fiddleheads make their puckish appearances.  But for me, spring has a darker edge: every year it sparks in me a devastating wanderlust.  Each spring day with picture perfect roadtrip weather, warm enough to drive with the windows down, overcast enough to keep from baking, makes me want to jump behind the wheel and revel in the open road.  Frustration sets in when I realize I am living smack dab in the middle of a city of over eight million people, trapped in on all sides by hours of gridlock.

With this restlessness stirring within me, choosing to make chorizo for this month’s charcutepalooza challenge (making uncased sausages from scratch) was a no brainer.  The southwest has been a feature of several past road trips, memorable for the food as much as for the otherworldly landscape.  And recreating those flavors, and memories, was just what I needed to alleviate a little of my cabin fever.

Monument Valley, on the border of Arizona and Utah
Making sausages from scratch is an extremely rewarding process.  The flavor profile can be tweaked to exactly fit your taste.  In this case, I included dried New Mexican red chiles, which I had purchased near the Guadalupe mountains in Texas on my last road trip, to bring out a more southwestern taste.

 
Deciding to make tamales with my chorizo was also an easy decision.  It was on a much earlier trip through Texas and New Mexico with two of my best friends, where I first learned to love the taste of corn tortillas.  Their earthy flavor and grainy texture is an acquired taste in contrast to the simple pleasure of their flour counterparts, but one I acquired with a vengeance.  The taste became something I craved in its other forms as well: in hominy and of course in tamales.  I’ve made tamales a couple times before, but only using masa harina, a poor substitute both in taste and nutritional value for the traditional nixtamalized masa.

So last weekend, ken and I ventured out to Jackson Heights, home of Tortilleria Nixtamal, one of the few places in the metro-ny area where traditional masa can be obtained.

Of course on such a gorgeous day, we couldn’t resist sticking around for lunch.  Lounging in the airy back patio, secluded from the city by a brilliant yellow fence, with soccer “en vivo” airing on the flatscreen, we felt transported to a more exotic place.  For about an hour that sunny Saturday afternoon, we got to eat tacos, tamales, and a big bowl of pozole, sip Mexican coca-cola, and pretend we had finally escaped the big apple.

Pozole with tacos carnitas and al pastor
Close up of the pozole, full of delicious hominy
And that evening we returned home with a most precious souvenir, three pounds of freshly ground masa!
We kept the tamale filling simple - chorizo sauteed with shallots and garlic until just cooked through, to highlight the carefully calibrated flavor of the sausage.

The dough was made following the instructions in this Rick Bayless recipe, with tremendously good results.  The trick, I learned, other than using real masa, is to use home rendered lard.  

Once a nutritional scape goat, it is now generally accepted that cooking with lard does not require a death wish.  Home rendered lard is more nutritionally sound than the packaged stuff, which is hydrogenated to make it more shelf stable.
  (For more info check out these articles from the new york times, slate, and food and wine.)  The lard, whipped to a buttercream consistency, ensures flavorful, fluffy tamales (as opposed to the dry dense tamales one usually encounters).

The whipped lard is combined with masa and chicken stock to make a dough with a consistency similar to cake batter.  The tamale dough is then spread onto pre-soaked corn husks, and topped with a generous scoop of chorizo filling.

Each side of the corn husk is folded over to completely enclose the tamale, and the ends are tied off with thin strips of corn husk.  At this point, the tamales are ready to be steamed and served. 

In all modesty, these were the best tamales I have ever had.  Usually I find tamales slightly dry and a little bland, primarily a vehicle for showcasing a flavorful and saucy filling.  The lard of course added a lot of flavor, but more startling was the prominent corn flavor, reminiscent of my travels through the land of enchantment.  The texture was moist and airy, a perfect bed for the juicy chorizo filling.  

It was with great pride that I brought these tamales to our mothers’ day pot luck dinner.  Although compliments from people who love you have to be taken with a grain of salt, everyone, my mom and grandmother included, raved about my contribution.  And the opportunity to spend an evening with my family, enjoying delicious food and each others company, made me realize there are some things worth staying close to home for.  
Tamale served with a guacamole taquero
----------------------------------------------
The process described above was based on a tamale dough recipe which requires no alterations from me, and on a filling so simple, no written recipe is necessary.  However, I wanted to offer a recipe to my readers, and so I asked ken, who is a great, amateur bartender to come up with a cocktail pairing.  If eaten outdoors on a sunny day, these tamales need nothing more than a cold beer, or maybe a michelada.  But if you want to make them part of a more classy Mexican inspired cocktail party, this is the drink we suggest:

Choke-a-mole
loosely based on the Choke Artist
40 ML Tequila Blanco
20 ML Dry Vermouth
20 ML Cynar
2 Dashes of Bitterman’s Mole Bitters
Stir with Ice, strain into whatever kind of glass you feel like using.  Garnish with lemon peel.  

Friday, April 15, 2011

Tasso | Charcutepalooza, challenge no. 4

 
After our charcutepalooza “practice run" with smoked turkey, ken and I tackled the official challenge, making tasso ham, a cajun dry-cured and smoked pork shoulder.  Because the pork shoulder is sliced into thin slabs before curing, it calls for a relatively short curing time of four hours.  The entire process of making tasso can be completed start to finish in less than one day, which is about as close as any charcuterie project can get to offering instant gratification.  After curing, the slabs are coated in spices and smoked.

The day before we had problems getting the Bradley smoker up to temperature, but decided to give it another try.  Ken deftly diagnosed the problem, finding that the lever that controls the temperature wasn’t working.  He employed his expert engineering skills, and with crackerjack timing, fixed the faulty lever by “jiggling” it while making temperature adjustments.
And less than three hours later, we had tasso!


We had eaten tasso before, but it was nothing like this one.  The meat was juicy and salty, the crust almost too spicy to enjoy alone (I may have overdone the spicing), but perfect in a gumbo, which is exactly how we ended up using it.  
Our go-to cookbook for cajun cooking, Chef Paul Prudhomme’s Louisiana Kitchen, has several gumbo recipes but none that use tasso.  However, we have made the seafood and andouille gumbo so often that we figured we had the basic technique down well enough to improvise.  
One of our favorite stands at the greenmarket is John Fazio’s Duck Farm, which sells chicken, duck and rabbit.  Although they are our regular source for chicken and duck (and, in fact, they supplied the meat for my first charcutepalooza challenge, duck prosciutto), we have never actually cooked one of their rabbits.  Thinking this would be a great time to remedy the omission, we chose to make a rabbit and tasso gumbo.
This was my first time working with rabbit so, although the meat would ultimately be shredded into soup, I took the opportunity to try my hand at breaking it down into its usable parts.  For reasons completely beyond me, I had assumed it would be like taking apart a really skinny chicken.  Apparently someone needs to explain to me the difference between a bird and a rodent.  A rabbit is a rodent, right?  Regardless, I think I did a pretty good job with this bunny for my first try.
In fact I was so proud of myself for getting the tenderloins out somewhat cleanly that I kept them out of the soup, and featuring them in their own course alongside the liver.
Whenever I make meat based soup, strew, ragu - anything which requires both a braise-tender meat and stock, I like to braise the meat ahead of time, over a basic mirepoix, bay leaf and parsley.  I remove the meat once it reaches the desired texture and strain the liquid, yielding plenty of stock to use in the final dish.  Although less crucial for a lean meat like rabbit, this method allows me to degrease the liquid in advance, strain it of impurities, and reduce it as necessary, without worrying about overcooking the meat.  Applying the same technique here yielded tender boneless rabbit meat, and just over six cups of flavorful rabbit stock.
One of the most important parts of a gumbo is the prep work.  Once the actual cooking starts up, there is very little time to get things measured and chopped, even with two people in the kitchen (especially when one of them is busy taking pictures of the process!).  To prepare for our gumbo cooking we combined and set aside all the necessary seasoning, and brought the stock to a simmer.  We combined chopped garlic, onions, celery and green bell peppers in one bowl.  And, in another, went our lovely diced tasso.  
And finally we started the actual gumbo, which began, as all gumbos do, with a dark roux.  This is the most labor intensive part of making the gumbo, because it requires constant whisking and careful attention.
Once the roux took on the right color, half of the chopped vegetables were stirred in, followed a couple minutes later with the rest of veggies and the diced tasso.  After a few more minutes we stirred in the seasoning mix and removed the pan from the heat.
We then added the roux mixture to the bubbling stock, one spoonful at a time, stirring all the while to make sure it was well incorporated, and brought the whole thing to a gentle boil.  At this point the stressful portion of the cooking is over.  We let the gumbo boil away for about 45 minutes, allowing the flavors to develop and the gumbo to thicken slightly, while we enjoyed our first cocktail of the evening, a Vieux Carre.  The recipe came from the ever informative site on all things New Orleans, The Gumbo Pages).  
After 45 minutes of boiling, we reduced the heat and added the rabbit meat.  The gumbo simmered for ten more minutes, before we served the whole thing over Prudhomme’s basic cooked rice.
And the final product?  Amazing!  I was afraid I would miss the taste of the andouille but the tasso gave it the perfect spicy smoky porky flavor.  We both preferred the tasso to our usual andouille, as the sausage often leaves a grease slick on the surface of the final gumbo.  There’s a good chance as long as there is tasso in our freezer, it will be replacing andouille in most of our cajun cooking.  Until, of course, we have a smoked sausage challenge, in which case a homemade andouille may be back in the running.